Even though the goal for the Beagle Article was to introduce you to one of many ways you can unleash the power of SharePoint designer with DataView Web Parts, to show how you can create a business solution without custom coding and in a minimum time-frame. I originally picked this scenario just because most of you who are working in medium- to large-sized companies can relate to this topic.
As it turned out, most of you were actually looking for something to solve this particular business need.
So.... Due to the overwhelming demand for a "FULL" version of this solution.. without further interruptions.....(drums)... here it is...
The following solution will help to facilitate class scheduling and management of attendees by providing employee self-signup functionality and attendance approval administrative interface.
Let’s review the functionality required. An employee of the company goes to the training site and sees all available classes that were scheduled by trainers ( Figure 1). With a click of a button they sign up for the class of their choice and are presented with a list “My Classes”, this list allows employees to keep track of classes they have signed up for. All classes scheduled will have a limited number of seats, and people that sign up for a class will have to be approved by a trainer or a manager. Once the person gets approved, the number of seats gets automatically updated to reflect the number of people attending the class.
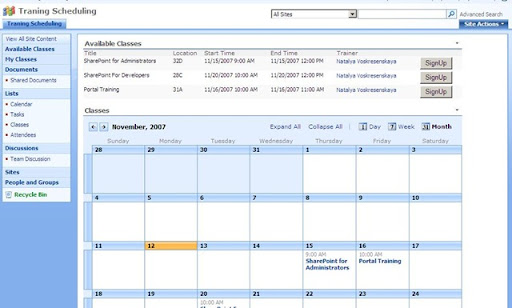
Figure 1
The site that this solution will be built in, is created using a team site template. Create a calendar list named “Classes”, this list will be used to schedule classes, track number of seats available, and assign trainers to a class (Figure 2).
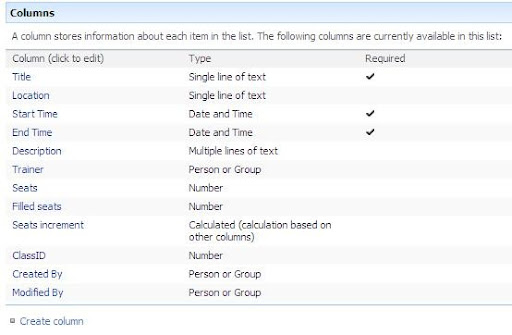
Figure 2
Only four fields in this list need an explanation:
1. Seats – this column will hold a number to represent a total number of seats available for this class.
2. Filled seats – this column is going to hold the number of attendees that signed up for the class a have been approved by a manager, the default value is “0”.
3. Seats Increment – this column will be used to increment “Filled Seats” column. This is created as calculated field. When an attendee gets approved by a trainer, Filled seats column will be updated with this column value which is [Filled seats] +1. (Figure 3)
4. ClassID – this field will hold the same value as the actual raw ID. It will be populated by a workflow on creation of an item in the list. This field will be used to identify the raw in Classes list to increment “Filled seats” column when attendee gets approved to attend the class.
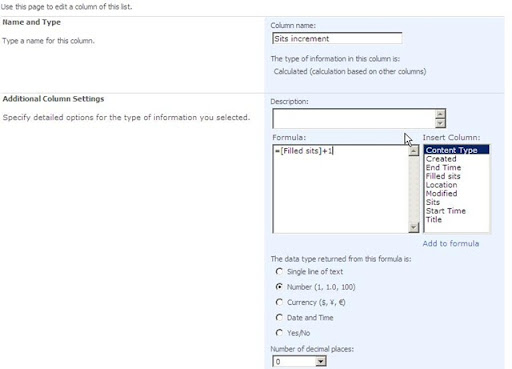
Figure 3
Open this site in SharePoint Designer and create a workflow based on Classes list, verify that the workflow starts on new item creation, set field “ClassID” to “Classes:ID”, or to Current Item ID.
Second, create a custom list called “Attendees”. This list will be used to keep track of people signed up for a particular class (Figure 4).
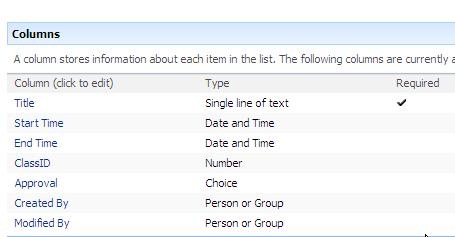
Figure 4
1. Title – Title of the class employee signed up for.
2. Start Time – Start Time of the class employee signed up for.
3. End Time - End Time of the class employee signed up for.
4. ClassID – this column will hold a raw ID of an actual item from the Classes list and will be used as a link between two lists.
5. Approval – this column will be a choice column with following values: Pending, Approved, Rejected. The default value in the field will be “Pending”.
These columns will be populated with information by a workflow triggered by an employee clicking the “Sign Up” button.
Open dafault.aspx page in SharePoint Designer.
Insert DataView Web Part onto the default.aspx page. Choose “Classes” list as your Data Source. In “Common Data View Tasks”, click “Edit Columns” and select Title, Start Time, End Time, Location, Trainer and Seats as displayed columns (Figure 5).
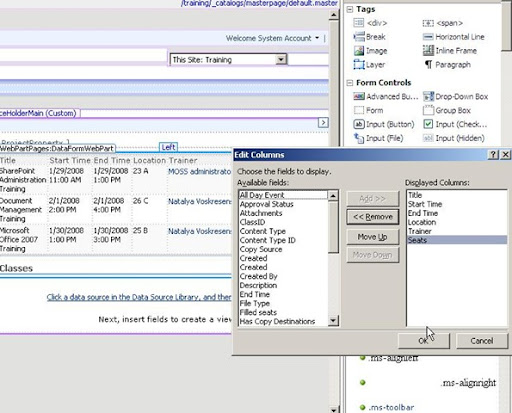
Figure 5
Once the Data View Web Part is rendered, add a filter to the view where “Start Time” is equal or greater than [Current Date], there is no, or little value in allowing users to sign up for a class that has already passed. In the DataView Web Part insert an extra column to the right of the “Seats” column. Open “Toolbox”, drag and drop “Form Action Button” control into this empty column. SharePoint Designer will then prompt you with a “Form Action” menu. Double click “Custom action” and click on “Settings”.
This action will bring you to the SharePoint Designer and create a new workflow that will be attached to the button. Create a workflow variable called ClassID as “List Item ID”. We will use it to pass the selected Item ID parameter from the DataView Web Part into this workflow.
Next, create an action that will trigger “Create New List Item” in the “Attendees” list. The title will be a value from the “ Title “ field in Classes list where Classes:ID equals workflow variable “ClassID” . Next, you will add a “Start time” field and set it to Classes list’s Start Time field (where Classes:ID equal workflow variable “ClassID”). Repeat this routine for population of the End Time field value. Add ClassID Field from the Attendee list and set it to workflow variable “ClassID” (Figure 6).

Figure 6
Save the workflow. In Tag Properties of your Form Action Button, change the value property to “Sign Up”. Go to your “onClick” event. It should read something like this:
javascript: {ddwrt:GenFireServerEvent('__workflowStart={{7696F6EA-2079-4A53-A97B-CE61D99A02AB},New,{66402E3B-C94E-4E6F-9936-10E596CC5795},}')}
Modify it and add the following (see addition in red color):
javascript: {ddwrt:GenFireServerEvent(concat('__workflowStart={{7696F6EA-2079-4A53-A97B-CE61D99A02AB},New,{66402E3B-C94E-4E6F-9936-10E596CC5795},ClassID=’,@ID,’};__redirect={MyClasses.aspx}'))}
This change will allow you to pass an input parameter into a workflow and redirect your employee to MyClasses.aspx page that has attendees list view filtered by Created field equals [Me].
Create My Classes view in Attendees list and add this to MyClasses.aspx page, don’t forget to save your default.aspx as well.
The next part of this solution is the creation of the administrative interface that will be used to manage attendees and classes.
Create another page “ManageClasses.aspx”. Insert DataView Web Part with Classes list as the data source, then insert another Dataview with Attendees list the Data Source. Right-mouse click on Classes DataView and select Web Part Connections. Choose “Send Row of Data To”, then “Connect to a Web Part on this page”. Next, select Attendees Web Part and choose “Get Filter Values From”. From the Attendees side, select ClassID and from Classes select ID (Figure 7).

Figure 7
Finish this wizard and save the page. Next go to Attendees’ Data View Properties, select “Editing Tab”, Check “Show edit item links”. Save the page.
Create a new workflow and attach it to the attendees list.
The workflow should start on an Item change event. As the next step, create a condition “Compare Attendees field”, choose “Approval” field equals to “Approved”. Under this condition create an action that will update list item in “Classes” list. Select “Filled seats” field and set it to “Classes” list “Seats increment” field value (If you remember, we set this field to a calculated value of “Filled seats” column plus one) where Classes:ClassID equals to Current Item’s ClassID (Figure 8).
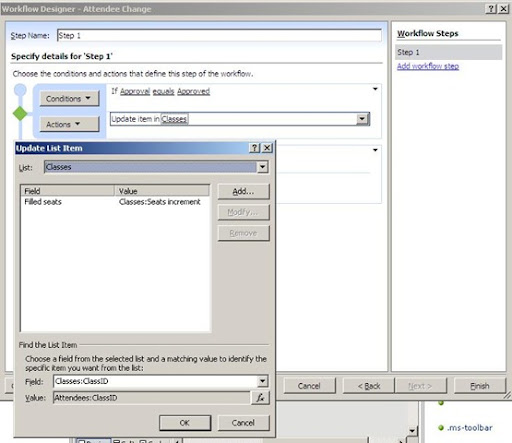
Figure 8
As the next step add another branch to your workflow, set the condition and check for “Approval” field to be equal to “Rejected” value. In actions menu use send an email notification to the user who created the current item, this email will notify the attendee that their attendance for the class has not been approved. Add another action to this branch to delete the current item.
Here is how your workflow will look at the end (Figure 9).

Figure 9
Let’s review the solution and recap.
When a trainer goes to ManageClasses.aspx page and clicks on a particular Class, he/she will be presented with a list of people that signed up for this class with ability to approve/reject the attendance for chosen class(Figure 10). When attendee is rejected, attendee receives an email notification and the record gets deleted from Attendees list. If attendee gets approved the number of seats filled for this class gets incremented.
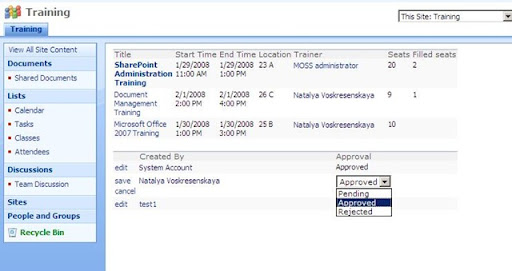
Figure 10
Both groups benefit from this solution, SharePoint users are able to sign up for a class with a single click of a button, and training managers have simple to use interface to quickly and efficiently manage classes and attendance.
ENJOY!


19 comments:
I copied and pasted your Javascript onclick event code but it is an invalid statement (missing a } I think). I was going to just copy and paste your event and change my GUID's.
Natalya, I thank you for the solution. I learned very much from this even though I actually don't get it to run. When I try to insert the javascript, I get an error message about an invalid numer of arguments. Do you have any hint for me?
Greetings and thanks for your work
Andreas
Hi Andreas. First of all make sure your workflow already has this input parameter created. Second of all send you javascript string to me, I'll take a look at it.
Hi Natalya,
Great article, the only thing that confuses me is how to create the aspx pages. Is it via SPD and put the aspx pages into the root of the teamsite? Because i believe that's the only way the redirect will work, but i'm not sure.
Regards, Mark
The way I did it here was: I would save default.aspx page as myclasses.aspx into the root of the site in SPD. this way you also have all zones and content, from default page, so no reinventing of the wheel happens here.
Hi Natalya,
thank you very much for this solution; it makes a lot of sense, and it diminishes the sense of amazement I felt when I started to work in SPD and realised that there was no defined way to pass variables into a workflow.
However, I am having difficulty building a Javascript string for my particular requirement; SPD had already built a concatenation into the string (because I am passing form fields into the workflow to populate an email) but I cannot successfully add to it (to pass the ID of the list item my form is editing). It seems to use a * syntax rather than commas to separate the passed variables. Would you be willing to have a look at it?
Regards.
Ibrahim, send this string to me. we can take it off-line, if I have your email
Thanks! That was great.
Any chance you could go through changing the security? I had to make my visitors contributors to make it work, however I thought I could just do that on each list.
I cannot seem to get the Form Action Button to work either. I am also getting the Invalid number of arguments error. Any help would be greatly appreciated.
javascript: {ddwrt:GenFireServerEvent(concat('__workflowStart={{8ABB28A6-56F4-4A12-8534-4856FC9846E1},New,{DAC58B5D-EBCC-48AC-8E08-E7FB09C0CC20},ClassID=’,@ID,’};__redirect={MyClasses.aspx}'))}
Yeah, there's a small glitch with quotes around @ID. Try this :
javascript: {ddwrt:GenFireServerEvent(concat('__workflowStart={{7696F6EA-2079-4A53-A97B-CE61D99A02AB},New,{66402E3B-C94E-4E6F-9936-10E596CC5795},ClassID=',@ID,'};__redirect={MyClasses.aspx}'))}
This is great information, but I cannot get the button to start the workflow that adds an Attendee. Can you help me please?
This is a fantastic solution,but I have made a mistake somewhere and I can not find it. When the user clicks on the sign up button, the message "An error occurred processing the data view. The XslText property is empty." displays.
Please Advise Thank You
EL, you'll have to give me more info than that.
John, try to re-do the DVWP and see if this is a persistent issue.
This message could have been generated based on sooooo many situations and debugging XSLT is never a clean job to me :-)
My organization needs a solution like this, however I need people to be able to sign up other users for classes or for SharePoint not to use the account logged in as the Attendee. We use a generic Windows Active Directory account in some areas and we have SharePoint set to authenticate using the Active Directory account. So if multiple people in that area signed up for a class, it would look like the same user signed up multiple times. Any suggestions?
ANyone else have issues with the Seats increment and filled seats? Not seeing any movement once I approve someone. Ideas?
are you loggin in as System account by any chance?
Yes, I am. Is there a way to see another screen shot of the attendee workflow?
The workflow will not start automaticaly because you are loged in as system account http://spforsquirrels.blogspot.com/2008/02/sharepoint-designer-workflow-does-not.html
Hi Natalya,
can you tell me the parameters which are sent to 'workflowStart'. Cos when i created the form action i get this javascript generated javascript: {ddwrt:GenFireServerEvent('__workflowStart={,,{FBE64AF7-5A72-43E0-8339-293FD3ADFD37},}')}
where as your javascript code has a "new" and another GUID attached to it. What does it do?
if i use the following
javascript: {ddwrt:GenFireServerEvent('__workflowStart={,,{FBE64AF7-5A72-43E0-8339-293FD3ADFD37},MachineID=',@ID,'}')}
i get XSLT error
this doesn't give any error but seems the workflow doesn't trigger.
javascript: {ddwrt:GenFireServerEvent(concat('__workflowStart={{FBE64AF7-5A72-43E0-8339-293FD3ADFD37},MachineID=',@ID,'};'))}
Post a Comment