Thursday, December 4, 2008

Thing that should or should not be done to SharePoint admin account

Here is a short list of most common scenarios that people should be aware of regarding SP admin account on AD:

1. When the account initially is created, set "Password never expires" account property to true. This is not a regular user account hence it should comply with service account settings rules. If the password changes, reset passwords to reflect the new password in the Application pool identity.

2. If you are not happy with you "spappadmin" or "spadmin" (fill in the blanks) farm admin account name, DO NOT DELETE IT AND CREATE NEW ONE with the desired name.  just rename this account in AD, this will make sure that the SID remains the same and the security settings do not have to be recreated for this account EVERYWHERE.

this applies to any other account in AD, but admins do know it.

3. if your farm admin account without password change suddenly looses connection to the DB and in the log you see account "[blank]" could not be authenticated to the SQL.  most likely your account got corrupted in AD.

Another scenario, Farm is still functioning fine, but when you try to connect to the SQL remotely using farm admin account connection fails.

You will still be able to access you farm since the trusted connection had been established before the AD account got corrupted, but you will not be able to establish any new connections with it.

In this case just recreate admin account in AD and go through the pain of recreating security settings or changing SIDs.

Enjoy :-)

Shared Services Provider app pool

When you create Shared Services provider in your SharePoint Farm and want to assign already existing app pool make sure that the name of this application pool is exactly the same as SSP name. If the name is not the same then Sharepoint will create new app pool with SSP name even though the new SSP will use the app pool that you assign to it. Why I think it's important is the amount of app pools will directly impact the performance of system.

Just examine you IIS and delete this unused app. pool.

Saturday, November 29, 2008

Customizing SharePoint with third party applications

Solution provider takeaway: Advise your clients on how to choose among the proliferation of third-party products available for customizing SharePoint.

As a powerful tool with document management capabilities and workflows that automate manual processes, Windows SharePoint Services has become the platform that many companies turn to as a solution for changing business needs. SharePoint also provides a foundation for building Web-based business applications that can easily scale to meet business growth. As a result, there are a plethora of third-party suppliers of custom SharePoint products.

In some cases, these third-party applications and add-ons add flexibility or more functionality to the basic feature set offered by SharePoint, and in others they enable powerful administrative capabilities and allow integration with critical business applications and databases.

read more

http://searchsystemschannel.techtarget.com/tip/0,289483,sid99_gci1338980,00.html#

Tuesday, November 18, 2008

Are you smarter than a 6th grader? (continued)

Congratulations to all the winners:

David Welker

jabs

Pedro

Caligari

Ula U

Pedro Miguel

vera73

Thank you all for your participation, You are smarter than 6th grader or maybe on the same level :-)... just kidding.

You all got it right!  Some of you were impatient to get the correct answer so I'm doing this post a bit earlier than I should.

All of you that are interested in the answer to the problem that I posted yesterday, click on the following link and read comments.

http://spforsquirrels.blogspot.com/2008/11/are-you-smarter-than-6th-grader.html

Enjoy

Monday, November 17, 2008

Are you smarter than a 6th grader?

Try your problem solving skills.

Here is the problem I was presented with at the SharePoint Connections 2007. For some reason SharePoint folks did not want to hang out with me, so I've found myself in the company of "SQL Geeks" ... SQL is my OTHER favorite thing...

So here is the thing, one of the SQL gurus tells me the "problem" he had to solve at his job placement interview, he also specifically mentioned that the problem might not have a solution, it is just a way to explore your way of thinking.

Here it is:

1. you have 8 balls. all of them are of the same weight, but one.

2.   you do not know if this one ball is  heavier or lighter then the others

3.  you have the scale to measure the weight of these balls, but you can measure it only 3 times.

I'm opening the competition for all of you to tell me the right answer.  Send you ideas in form of comments.

The reason why I want to post it is that I've given this problem to my 11 year old son, who in turn was trying to get away from dong his extra curriculum activities (like vocabulary enhancement).

To make the story short he solved this problem in 1 hour!!!!!!

Hellooooooo, in ONE hour. it took me the whole flight from Orlando to New York  to even overcome the fact that this "problem" might have a solution.

Try your self out, I'll post the solution next week.

Thursday, November 6, 2008

Free learning resources for SharePoint

This following site is worth checking out. Especially for some of you that want to take their SharePoint skills set to the next level. It provides "Program Guide" and even "Graduation" :-)

My favorite part about free online training resources is the self paced learning approach that allows you to make your training class available anywhere the Internet is.

http://msdn.microsoft.com/en-us/rampup/default.aspx

Enjoy!

Sunday, October 12, 2008

Moss SP1 upgrade

After installing binary for WSS SP1 and MOSS SP1 and running Configuration Wizard I’ve received Upgrade failed message on step 6 of 9. Event log had shown Eventid 104 and 100. Inspection of Services had shown that the Timer service has been stopped after trying to restart it "logon failure" was thrown, resetting the identity of this service back to farm admin account has resulted in the successful start of this service. I rerun Configuration Wizard now step 8 of 9 "fails to start SPSearch Service Instance, start it manually" and it followed by the same failure to upgrade message.

Further inspecting logs revealed that search could not start due to logon failure as well.

What solved it all was resetting WSS Search to farm admin account explicitly and rerunning Config Wizard.

I’m not exactly sure why it had to be done so, this was a development environment the was in fairly healthy state and all services had been running under the same farm admin account. The logon failure messages did not make much since since all services were running fine before the upgrade.

But it worked.

Time to upgrade the production environment, oh.. almost forgot … Infrastructure Updates time

Technorati Tags:

.

Enjoy

Thursday, October 2, 2008

MVP Squirrel

My dear squirrels readers, I was happy to learn yesterday that I have been awarded the Microsoft MVP (Most Valuable Professional) award.

It's an honor to join the SharePoint MVP team and get in contact with best of the best in the SharePoint community. 

Technorati Tags: ,

Monday, September 22, 2008

SharePoint Best Practices Conference

The conference is over and it was a great success!

Mindsharp team had organized everything very neatly with great attention to details. I don’t believe they had anticipated such a big success, but they did a good job rearranging some of the sessions and session locations in order to accommodate attendees and speakers.

I’ve attended many great sessions and finally got a chance to meet with some of the people that I’ve been friends with for a while.

By the end of the conference I was very exhausted, the main reason is that it was the first one when I had a chance to speak at my very own session on developing training strategy for SharePoint staff, I also co-presented at this conference with my friend and colleague Paul Galvin on a case study in governance.

To my luck I got severe cold before the conference so I’ve spent the whole time coughing and carrying boxes of tissues. And on Wednesday I even lost one of my contacts so during the whole Training speech I was half blind J But thanks to all support from my friends Bob Fox, Paul Galvin, Spence Harbar, Agnes Molnar and all great people that attended it was a walk in the park. I was very nervous in the beginning, but then I remembered that the audience is there not to see you fail, but to see you succeed and sure enough Todd Bleeker popped in with his cheerful smile and it put me at ease.

If you were unable to attend this conference I urge you to sign up for the next one in February as soon as the registration opens as the number of attendees will be limited and you can’t afford to miss all the great tracks that it will offer.

PS: bellow you will find inks to all slide decks

I'll see you there :-)

"Formula for Success" Training your SharePoint staff

Taming the “Wild West” A Case Study in Governance

Friday, September 19, 2008

Set default date to first day of the current month

This is small requirement I received to make a date column in a list and make it to

default to the first day of the current month.

I'm sure that for most of you it will not be something difficult to do, but for those struggling here are the steps:

1. create a date type column.

2. In the default value of this column to the following formula

=DATE(YEAR(Today),MONTH(Today),DAY("1-Apr-2008"))

instead of "1-Apr-2008" you might want to use any date that reflects the first day of the month, DAY() function will extract the needed number 1.

Enjoy

Technorati Tags: ,

Sunday, September 7, 2008

SharePoint Best Practices Conference

I'll be at the SharePoint Best Practices Conference in Washington September 15-17. I'll be co-presenting at this even with my colleague Paul Galvin on Tuesday the 16th:

Real World Governance: "Taming the Wild West "

As well as presenting at my very first session on Wednesday 17th:

"Formula for Success" - Training your SharePoint Staff

This session will cover all roles and role based training approach.

This presentation will cover:
- Identification of the key roles involved in the usage/development/maintenance of the SharePoint Portal
- Describe the type of training each role is required to receive based on their responsibilities
- How to deliver more focused and relevant training

Audience members should gain enough understanding of the importance of delivering training to all roles involved in a successfully SharePoint implementation, and with concrete and useful information that help them to develop the right training strategy.

Stop by and say "hi" :-)

I'll see you there.

Tuesday, September 2, 2008

SharePoint training approaches

I've just realized that my article had already been published on TechTarget "SharePoint Training".

Let me make something clear, I am not a trainer, the reason I've chosen "training" topic is because in my experience the biggest obstacle in end-user adoption is lack of competence and general basic knowledge of the SharePoint  environment and it's functionality.  This can be addressed through delivering right training.  Take a look at this article, hopefully it will help you to define  and customize your training a well as explain different delivery methods.

Technorati Tags: ,,

Wednesday, August 13, 2008

Support me and my team (not Technology related)

Dear Friends,

I will be joining friends of my brother to walk with thousands of other people in AFSP's 2008 Out of the Darkness Community Walk to benefit the American Foundation for Suicide. As you might know this is a very personal issue to me, my brother had been missing for over 3.5 years when he left he also left a note alluding to possibility of a suicide. I would appreciate any support that you give me and our walk team for this worthwhile cause.

Some Basic Facts

  • In 1996, more teenagers and young adults died of suicide than from cancer, heart disease, AIDS, birth defects, stroke, pneumonia and influenza, and chronic lung disease combined.
  • In 1996, suicide was the second-leading cause of death among college students, the third-leading cause of death among those aged 15 to 24 years, and the fourth- leading cause of death among those aged 10 to 14 years.

Click here to read my blog dedicated to my brother Arkadiy Tashman  http://arkadiytashman.blogspot.com/ 

Unfortunately the teenage suicide rate is rising dramatically every year, Let's all do something about it.

The American Foundation for Suicide Prevention is at the forefront of research, education and prevention initiatives designed to reduce loss of life from suicide. With more than 32,000 lives lost each year in the U.S. and over one million worldwide, the importance of AFSP's mission has never been greater, nor our work more urgent.

I hope you will consider supporting my participation in this event. Any contribution will help the work of AFSP, and all donations are 100% tax deductible.

Donating online is safe and easy! To make an online donation please click the "Support This Participant" button on this page.

http://afsp.donordrive.com/index.cfm?fuseaction=donorDrive.participant&eventID=634&participantID=9067

If you would like to join or support any other member on our team, you are very welcome http://afsp.donordrive.v b/index.cfm?fuseaction=donorDrive.team&eventID=634&teamID=6519

Please remember that there is not minimum donation, anything you can.

Thank you

Tuesday, August 12, 2008

Secondary workflow

So what is it and how does it help to have a secondary workflow?

To better depict the picture I'll start with the following scenario: there is a complicated document management system with many approval workflows etc. one of many workflows is triggered by a document upload, the workflow type is determined by some of the metadata of the document. when an approval task is created by "collect data from user" action in the SPD workflow creation, the approval task should indicate the type of the document and some additional metadata of the document such as if approval of the document is urgent, due date for the approval, etc. (you finish the list :-) All of this information is indicated by end-user during the document metadata input. But... when the task is created the next step of the workflow is not executed until user completes the task, even if I put "update item" action in the next step to update metadata of the task with document's metadata, it will do so only after the task is completed, which completely defeats the purpose of this step.

Secondary workflow to the rescue…..

When you create a workflow on the tasks list and start it on item creation.  You will update the metadata of this task with the metadata of the document and reference the document by using "Tasks:Workflow Item ID"

In the long run as soon as the task gets created it will update itself with the document metadata by finding the doc based on the following criteria "document library: ID" = "tasks: workflow Item ID"

This is applicable in any scenario where you want to reference the item that originated the workflow that had created the task.

Wednesday, July 16, 2008

International Sharepoint Professionals Association (ISPA)

As part of the ISPA board, I'm pleased to announce launch of ISPA web site, it can be viewed at: http://sharepointpros.org

ISPA had been operational for sometime already, but without any web presence it was much harder to get our message across and reach disparate Sharepoint communities all around the world.

You can read about ISPA and it's mission in the following news release.

The International SharePoint Professionals Association, also known as ‘ISPA’, is an independent, not-for-profit, community-driven organization dedicated to support SharePoint professionals and groups all around the world. The primary mission of ISPA is to promote the global adoption of SharePoint Technologies by providing support and guidance to the SharePoint community as a whole - by establishing connections between SharePoint professionals, groups, resources, education and information. ISPA is led and supported by volunteers across the world, and will focus on bringing the entire SharePoint community closer together.

ISPA’s first offering to the community is support to user groups around the world through free WSS v3 web sites for any group that becomes ISPA-affiliated. In addition, one of the goals of ISPA is to facilitate an exchange of ideas between user group leaders that helps increase the likelihood of their group’s success. Therefore, ISPA is providing leaders of user groups with access to collaborative spaces where they can interact with other user group leaders, sharing ideas, resources, best practices, guidance, and most importantly - support for one another.

ISPA has also established Regional Evangelists - existing community leaders who have previously exhibited a strong commitment to the promotion of the SharePoint community, and who have pledged to carry the ISPA message throughout their particular region. These evangelists are key local contacts who are available to work with local SharePoint professionals and user groups throughout their region to help promote the community and SharePoint. If you are interested in starting a user group, have an existing one, or need guidance - the ISPA Regional Evangelists are great resources who are available immediately to assist you.

Finally, as everyone knows, no community is complete without a web site, and ISPA is proud to announce the launch of its official site, http://www.sharepointpros.org. While the web site is still in the early stages of development, plans for multilingual support and exciting functionality that will assist anyone involved with SharePoint are on the horizon.

If you have ideas for ISPA, would like to start a user group, or are looking for assistance, visit the new ISPA web site or contact ISPA at contactus@sharepointpros.org. Together, as the community we can achieve what was impossible as individuals - become a part of ISPA today!"

Wednesday, June 25, 2008

Setting an alternative home page of portal in place of the default.aspx portal home page

Over time I've heard this request coming in several times, so this is the time to share my idea on how to make it happen. so far I've found this the easiest and quickest way. I'll talk about trade offs at the end.

This technique involves a couple of steps:

1. Add Content Editor Web part anywhere on your Portal home page, this web part will not be visible to end users, this is why placement does not matter.

2. Edit content of this Web Part through the HTML editor option available in the WP.

3. Paste the following script in there

<script type="text/javascript">

var start = document.cookie.indexOf( "MyPortalHome=" );

if (start < 0) {
     document.cookie = "MyPortalHome=Something";
     document.location.href="[my desired url]";
}

</script>

4. Replace [my desired url] with the url of your alternative home page

5. Save you changes :-)

Lets see what the script does:

var start = document.cookie.indexOf( "MyPortalHome=" );


This way we are checking for existence of the "MyPortalHome" cookie by setting "start" variable to the index location of the "MyPortalHome" cookie.


if (start < 0) {

if the cookie exists "start" variable will be more than -1, it will represent the actual start position of the cookie, if it is -1 then the cookie does not exist, meaning this is the firsts time user clicked on the portal url within this browser session. if this is the case we will execute the code below.
     document.cookie = "MyPortalHome=Something";

We are setting the cookie

     document.location.href="[my desired url]";

And redirecting users to the alternative Home Page.

If the cookie exists we are doing nothing. It will indicate that user got to this page before. T

he cookie will expire as soon as the user closes the browser, next time the user goes to the portal url the cookie will be set again and they will get redirected to the alt. home page.

Gotchas:

1. if the user opens a new tab in IE and goes to the portal home, the cookie will persist and they will not get redirected, only when the browser is closed the cookie will expire with the end of the session.

2. To set the cookie in the browser you will have to allow to execute the script, you can prevent this behavior by modifying your security settings for this zone, or add this site to a list of trusted sites.

Have fun

Thursday, June 19, 2008

SharePoint portal implementation approach

I was very excited to have an opportunity to write an article on the SharePoint implementation approach best practice topic for TechTarget. Unfortunately due to article's length limitation which I absolutely agree with (who has time to read lengthy article) I had to be very concise, but I’ve tried at least to mention the most important points.

The biggest challenge though is initial light weight approach to the SharePoint implementation project by the client. Most of the time companies view SharePoint as just another application to get their hands on. They do not understand that it is a platform which implementation demands a careful planing and design. Hopefully this message will get through to them and we will have to spend less time justifying the cost of the discovery and initial design phase and more time on building the most flexible and reliable platform.

Here is the link to the article http://searchsystemschannel.techtarget.com/tip/0,289483,sid99_gci1317689,00.html

WebDav interface within the SharePoint library

While the WebDav interface within SharePoint libraries provides a very useful function of opening the library and the whole Site collection structure through the Windows Explorer application, it might be more detrimental to your SharePoint solution then you think. Let me explain one business scenario where you will run into problems when using this;

Let's say your users want to edit PDF files from task view generated by a workflow that provides them only a link to the originating file. You know the outcome... the browser will open the file within it's self without the ability for users to save the document after editing into the source location (which is the SP library in this case), the doc will have to be saved onto their local HD and then re-uploaded into the library. What happens to the original document's metadata??? Yep, it's lost, the document is now a new entity within the library. Or the PDF file will be opened in Adobe Acrobat, but again without the ability to save this file into the source location.

In this case it seems that Adobe is fighting with Microsoft.

I've went around this restriction by opening the link to the PDF using WebDav interface (you can find the description here). You might think this is an answer to your question, if you make sure that all your desktops are OK for this.

After implementing this solution and reading a lot of different forum questions and comments on the usage of (citing) "Open in Windows Explorer" functionality, I've come to realization that people do not understand components involved into this functionality. OK, let's talk about one of the major issues that people are trying to troubleshoot: "why for some users this works fine...  the explorer opens quickly and they can manage the documents. For other users it takes up to 5 minutes before the explorer view opens.  During this time the browser becomes completely unresponsive."

First of all, it is not an issue on your SharePoint environment but it’s a problem on the desktop

Two words - "Web Folders Client" :-)

The webfolder functionality is implemented by means of MSDAIPP.DLL this is the DLL that is responsible for WebDav interface functionality. It usually resides inside "C:\Program Files\Common Files\SYSTEM\OLE DB" or it's language dependant equivalent (such as "C:\Programme\Gemeinsame Dateien\SYSTEM\OLE DB" for German Windows versions). To find the DLL version, select the file in Explorer, choose "Properties" from the right-click context menu, then select the "Version" tab.

Here is the link to the posting that explains it all. http://greenbytes.de/tech/webdav/webfolder-client-list.html

Do not expect all your desktops to have the same "working" version of Web Folders.

Another one: "when MS Office document is edited users have trouble saving the document back to the library"... well, there are several variations to the errors they are getting, but I'll not list them all, simply because I have not seen ALL of them.

In this case it is directly related to the user's rights to the desktop in relation to the account the user is logged into the SharePoint with (presuming that user logged into the desktop is not the account used to log into SharePoint). If the user does not have sufficient rights to this desktop, than FORGET IT unless you add the user account to the local desktop group. While this is not such a common scenario, because of the ways most of the networks are setup, but the case I'm describing here is when a number of users is relatively small within the company and IT decides that a user account expected to be used at this particular workstation should be added manually into local desktop group.

Before you start using WebDav interface make a number of considerations:

1. Are your desktop images are "STANDARD" (and do not use the definition of "standard image" loosely)

2. Are you ready to maintain the web folders component individually on all desktops if they vary in applications and versions of apps. that are being ran locally.

If your users are local admins on their desktops, may god help you then. J

Enjoy


Wednesday, June 18, 2008

Restoring PORTAL site collection from one farm to another

When you backup portal site collection from Farm1 and try to restore it  not as a portal site collection on Farm2,  but as  a site collection within a managed path, I'm afraid it not possible.

Even after several tries to do it, all I was getting was overwritten portal site collection on the farm that I tried to restore it to. So before you attempt to restore PORTAL Site Coll. into managed path Site Coll. be careful as this action most likely will overwrite your existing Portal Site collection.

And if you found a way to do it without overwriting  Portal Site Collection on the existing farm, leave a comment and let me know how.

Thanks

Monday, June 9, 2008

Event handler on a document library with custom editform

Even though this is probably a known issue, but I've been looking everywhere to find some information on this specific case and nothing surfaced. Here it is, the ERROR :-)  (the big, bad, SP error)I've been receiving "The data source control failed to execute the insert command." after filling out a metadata on a document within the document library with event handler (that fires up upon add item event).  Cause:  as part of my metadata I have a lookup column that is based on a list within the site and has "Allow multiple values" checked. Why it seemed that the event handler is cosign it? Well, I have another doc library with similar setup but there is not event handler behind it and it works just well. By the way it's not just a combination of Event handler and multiple choice lookup field, I also have a custom EditForm.aspx. Only after deleting my lookup field and recreating this field as a Choice field this problem has been resolved. And no, this is not SP1 environment. Hope it helps

SharePoint, event handler, Document library, custom edit form, multiple lookup field

Thursday, June 5, 2008

PDF Saga continues

Adobe, adobe...

One of our clients had asked for a very sophisticated library to support their company's legal communication review process. All the audit information is being kept in a version history of a document. The problem started when they started editing PDF document by applying the "Redaction" tool of Acrobat, by design you cannot save the original document, you can only save the edited document using "Save as".

When Redaction is applied to the document, the document is being stripped of all original information and metadata to protect the document’s original information. In order to achieve this level of document protection, the document must be saved as a new document which removes the original document from the SharePoint library and saves the “redacted” document as a new entity.

As soon as the document had been "saved as" within the SP library it gets a new item ID associated with it, this way preventing any already running workflows to be completed and removes all original metadata information. If you try to complete a workflow task associated with this "Redacted" document, it will give this error: "The data source control failed to execute the update command." because the original item associated with this workflow does not exist anymore.

I recommend that you do not to use redaction tool at all within a SharePoint library, resort to the use of “revision” tool, or don't expect this document to have anything in common with the original document.

By the way, the same applies to any Microsoft Office document which is "saved as" even if it is saved over the original doc by replacing it, but at least within Office you have to intentionally choose to "Save as". But with adobe "redaction" tool you are forced into "save as".

I guess people have to be educated on the purpose of "redaction" feature, if it was behaving any differently, it would completely defeat the purpose of “Redaction” tool.

Thursday, May 29, 2008

Versions.aspx Unknown Error

Latest findings :-)

Did you ever receive "Unknown Error" (love these descriptive messages)when trying to view version history on the item? I did. As it turned out it was directly related to the issue I had with viewing properties of an item. Anytime I've opened "View Properties" it would redirect me to the portal home page. Once the Dispform.aspx page was fixed, I had no issues browsing to the version history.

Because my priority was to resolve version issue before display properties redirection, all research was fruitless, If you are doing the same, take a look at your view properties page first.

Enjoy

Thursday, May 22, 2008

Native support for PDF and ODF by Microsoft

Finally, great announcement from Microsoft

When using SP2, customers will be able to open, edit and save documents using ODF and save documents into the XPS and PDF fixed formats from directly within the application without having to install any other code. It will also allow customers to set ODF as the default file format for Office 2007. To also provide ODF support for users of earlier versions of Microsoft Office (Office XP and Office 2003), Microsoft will continue to collaborate with the open source community in the ongoing development of the Open XML-ODF translator project on SourceForge.net.

In addition, Microsoft has defined a road map for its implementation of the newly ratified International Standard ISO/IEC 29500 (Office Open XML). IS29500, which was approved by the International Organization for Standardization (ISO) and International Electrotechnical Commission (IEC) in March, is already substantially supported in Office 2007, and the company plans to update that support in the next major version release of the Microsoft Office system, code-named “Office 14.”

Read it all here: 

http://www.microsoft.com/Presspass/press/2008/may08/05-21ExpandedFormatsPR.mspx

Can't wait :-)

Tuesday, May 20, 2008

Free SharePoint online training resources

Recently I felt compelled to set up a list of free online training resources, here it is (in no particular order):

1. Advanced lectures and white papers (Microsoft TechNet)

2. The Microsoft Office SharePoint Server 2007 Training, built on the Microsoft SharePoint Learning Kit, is designed for server administrators to install on an Office SharePoint Server site to help end-users learn about Office SharePoint Server.

3. Enterprise Search Training over 18 hours of free, deep technical training about Enterprise Search with SharePoint technologies

4. SharePoint 2007 Essential Training with: David Rivers (free demos)

5. SharePoint Server 2007 Courses (17 courses)

Share Excel data with others by exporting it to a SharePoint site Length: 30 min
SharePoint document libraries I: Introduction to sharing files Length: 30 min
SharePoint document libraries II: All about checkout Length: 30 min
SharePoint document libraries III: Work with version history Length: 30 min
SharePoint document libraries IV: Tips and tricks Length: 30 min
SharePoint document libraries V: How to download a library Length: 30 min
SharePoint slide libraries I: Set up a library for your team Length: 40 min
SharePoint slide libraries II: Use slides in the library Length: 40 min
SharePoint calendars I: Make the most of your team calendar Length: 20 min<
SharePoint calendars II: Connect a SharePoint calendar to Outlook Length: 20 min
SharePoint calendars III: Create your own calendar Length: 20 min
SharePoint calendars IV: Tips and tricks Length: 20 min
Workflows I: Basics you should know Length: 30 min
Workflows II: Collect feedback for a file Length: 30 min
Workflows III: Collect digital signatures for a file Length: 30 min
Workflows IV: Include someone outside your company Length: 40 min
Workflows V: Handy tips for tasks Length: 30 min


6. SharePoint Training Tutorials Step by Step How To Instructions. In these SharePoint screencast tutorials, get step by step instructions on all the features included in SharePoint hosting and how to optimize your site. The tutorials cover topics from Alerts and Creating Web Parts to Creating Meetings Sites and Wikis.

7. 2 Free Training Courses for SharePoint Here are 2 free training courses for SharePoint: Getting started with Services and Doing more with SharePoint Services. These are offered by the Instruction Technology Group at the University of Nebraska at Lincoln as part of their Microsoft eLearning Library. These interactive Office application training modules and tutorials were created by Microsoft. Note that to view the main training tutorials, you must be using Windows and Internet Explorer, however, you can use any platform/browser to view the Tutorial How-to Steps for each Lesson.

8. Microsoft Office SharePoint Server 2007 Training Standalone Edition The Microsoft Office SharePoint Server 2007 Training Standalone Edition is designed to help you learn how to use the features of Microsoft Office SharePoint Server.

9. Free AppDev training CD-Rom and download

10. WSSWiki - free community driven resource devoted to the Microsoft Windows SharePoint Services platform. (not quite training site, but you might find some of the articles helpful)

11. Free Demos from Hyperteach Windows SharePoint Tutorial - Training Videos

12. SharePoint 2007 Training Videos A series of 60 training videos (many of which are free) for SharePoint 2007. Categories include getting started, lists, documents, images, ideas, customization, sites and pages, security and integration. Topics include an introduction to SharePoint services, exploring the SharePoint site (free), user login options, adding announcements and calendar events, adding links (free), starting a custom list, importing lists from Excel 2007, a library overview, uploading documents (free), using version control, working with offline documents, initiating workflows, completing workflows, image web part (free), creating a picture library, using the discussion board, working with wikis (free), posting to blogs, staying informed with RSS, tree view navigation, changing a site theme, modifying web parts (free), advanced web part options, creating a basic page, adding a child site, creating a document workspace, make a meet workspace (free), site templates, security review, creating a custom group, groups permissions, Outlook 2007 calendars (free), Excel 2007 web query, Word 2007 document workspace, and more.

13. Bob Fox Videos more relevant to administrators

Alternate Access MappingsUse SHIFT+ENTER to open the menu (new window).
B2TR2-RTMUse SHIFT+ENTER to open the menu (new window).
Backup and RestoreUse SHIFT+ENTER to open the menu (new window).
SlipStreamUse SHIFT+ENTER to open the menu (new window).
Personalization_SiteLinksUse SHIFT+ENTER to open the menu (new window).
Setting up a Lab Part 1Use SHIFT+ENTER to open the menu (new window).
SP_Desktop_ShortcutsUse SHIFT+ENTER to open the menu (new window).
VirtualLabSetupPart2Use SHIFT+ENTER to open the menu (new window).

These links come courtesy from my good friends and fellow SharePointers, and Google err I mean Live Search  :-D

If you have some other cool online free training resources feel free posting links in the comments section.

Enjoy

PS: some people are not aware of the fact that I have another blog at Conchango, the following came to Conchango blog as comments from Jomit:


1. SharePoint Developer MSDN Web Cast Series starting from 20th May 08


2. Office/SharePoint Developer Screencasts from Ted Pattison :

14 'How to Videos' on WSS, MOSS and Office Development


3. Free WSS and MOSS Online Clinics


WSS Development


WSS Infrastructure


MOSS Development


MOSS Infrastructure

Wednesday, May 14, 2008

Open-Edit-Save PDF document into SharePoint library

Recently one of our clients had decided not to just preview PDF documents from the SharePoint library, but to edit it and save to the same location.

Because Adobe is not integrated with SharePoint, when you open a PDF file for editing and save it, it will not save to the source location (Document library), but instead it will save it to one of the folders on your hard drive depending on the preferences. In my case, client wanted to open these PDF's from tasks that were created through "Collect" action in SPD (they served to provide additional information on the approver's disposition) as you might know this action creates a content type and associates ASPX page used to collect information. Users expected to open up the task associated with approval of this PDF document, open up the document they were about to review from this Task, provide some comments within the document, save this PDF to the source location and state their disposition in the task Item as well. Through the addition of  XSL within the ASPX page associated with this Task content type I've achieved the desired functionality:

Before, the link to the document that triggered associated workflow to create a task looked something like this:

        Document: <a href="{substring-before(@WorkflowLink, ', ')}">
                        <xsl:value-of select="substring-after(@WorkflowLink, ', ')"></xsl:value-of>
                      </a>

This piece of code would output name of the document with link to the document.

I've modified it to open the location (folder) of this document through the Windows Explorer (WebDav interface), luckily I have only one document per folder:

Document: <a href="#" onclick="NavigateHttpFolder('{substring-before(substring-before(@WorkflowLink, ', '),substring-after(@WorkflowLink, ', '))}', '_blank');">                         <xsl:value-of select="substring-after(@WorkflowLink, ', ')"></xsl:value-of>
                       </a >

As soon as you open PDF Document through the WebDav Interface, by default Adobe will save this document after editing it in the same location.

...BUT... yeah, there is always a catch.

When you try to open Office document, such as word document, you will get an error "Your Client does not support opening this list in Windows Explorer".

Here is your answer:

http://support.microsoft.com/kb/923906/en-us even though it describes this error from the "Actions" menu, but when you dig dipper it all boils down to the problem described here, as limitation of characters in your URL to only 100 characters.

http://support.microsoft.com/kb/325355/

Yes, it is your answer, if you are running IE 6.0.2.8... or earlier, but what do you do if it is not the case and you are getting this error anyway. I have IE 7 and office 2007.

I personally tried almost every patch, and download, and IE settings out there. We opened a support ticket with Microsoft, no solution. NOTHING WORKED, I've stumbled upon some forum threads that were ended on a hopeless note.

In my case the answer was within the actual XSL, apparently the problem can be resolved by the reformatting the URL used within the onClick command.

if before the HTML output from this line :

Document: <a href="#" onclick="NavigateHttpFolder('{substring-before(substring-before(@WorkflowLink, ', '),substring-after(@WorkflowLink, ', '))}', '_blank');">                         <xsl:value-of select="substring-after(@WorkflowLink, ', ')"></xsl:value-of>
                       </a >

was

<a href="#" onclick="NavigateHttpFolder('', '_blank');"> as you can see no URL id being supplied here, what is even stranger is that the URL was always there for PDF documents, but not for the office documents.

If you replace each "/" with "\u002f" within your link variable (in my case it's @WorkflowLink) it will work just fine :-)Once I replaced the previous code it with:

Document: <a href="#" onclick="NavigateHttpFolder('{translate(substring-before(substring-before(@WorkflowLink, ', '),substring-after(@WorkflowLink, ', ')),'\','\u002f')}', '_blank');">                <xsl:value-of select="substring-after(@WorkflowLink, ', ')"></xsl:value-of>
                      </a>

The HTML output was the correct one, for all types of documents!

Document: <a href="#" onclick="NavigateHttpFolder('http://portal/Documentlibrary/FolderName/', '_blank');">

This work around allowed me to open WebDav for particular folders

lesson learned, before you start looking for patches even though your system should be fine, go into the source code and look at what actually happens there, are you providing all the right values?

This post should have been re-titled though, but....

Enjoy


Note: do not get hang up on this part "substring-before(substring-before(@WorkflowLink, ', '),substring-after(@WorkflowLink, ', '))" It's just a way (in my case) to extract the URL to location of the document. By the way in some instances you might not even need to replace "/" with "\u002f".

Tuesday, April 29, 2008

Fast Installation of Fabulous 40 templates

Over some period of time I’ve got tired of installing Fab. 40 templates solutions over and over again.

The time had come to write a script that allows for faster installation. This script will only install solutions associated with Fab 40 package, it’s up to you to upload site templates into site template gallery.

Bob Fox has graciously provided space on his server for this script, Thanks Bob!

Here is how to use this script:

1. Download Fabulous 40 templates from this location.

2. Run the downloaded file, this action will unzip all files into specified location

3. Download the script (right mouse click -> Save Target As), you can probably copy and paste it into notepad from here, but there is a big chance you will have to struggle with some hidden characters and the script will have hiccups J

4. Open this file in notepad and modify the first line

@SET SLNDIRECTORY=C:\Apps\

Change C:\Apps\ to the location where you unzipped your Fab 40 files to (keep the last slash)

5. Save the script with .cmd extension instead of txt

6. Run it from your server

This script will keep your server busy for a while, you might get “Service Unavailable” until the script stops and all timer jobs are finished (which is usually not longer than couple of minutes), but if you have users in your environment, run it during off-hours. This will install all solutions in one shot and globally deploy them immediately.

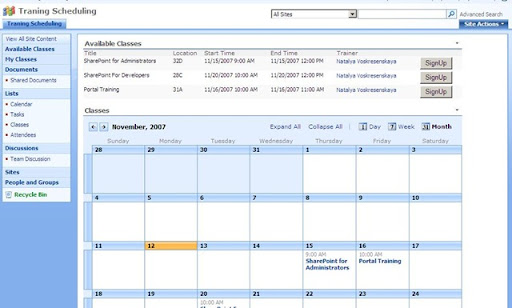
In your Central Administration, under solutions management check for all 20 solutions.

As the last step upload all .stp files into your site templates gallery.

Here is the source for the script, but you can download it here

:

@SET SLNDIRECTORY=C:\Apps\

@SET STSADM="c:\program files\common files\microsoft shared\web server extensions\12\bin\stsadm.exe"

Echo Adding Solution ApplicationTemplateCore.wsp

%STSADM% -o addsolution -filename %SLNDirectory%ApplicationTemplateCore.wsp

Echo Deploying Solution

%STSADM% -o deploysolution -name ApplicationTemplateCore.wsp -allowgacdeployment -immediate -force

%STSADM% -o copyappbincontent

Echo Adding Solution AbsenceVacationSchedule.wsp

%STSADM% -o addsolution -filename %SLNDirectory%AbsenceVacationSchedule.wsp

Echo Deploying Solution

%STSADM% -o deploysolution -name AbsenceVacationSchedule.wsp -allowgacdeployment -immediate -force

Echo Adding Solution BudgetingTrackingMultipleProjects.wsp

%STSADM% -o addsolution -filename %SLNDirectory%BudgetingTrackingMultipleProjects.wsp

Echo Deploying Solution

%STSADM% -o deploysolution -name BudgetingTrackingMultipleProjects.wsp -allowgacdeployment -immediate -force

Echo Adding Solution BugDatabase.wsp

%STSADM% -o addsolution -filename %SLNDirectory%BugDatabase.wsp

Echo Deploying Solution

%STSADM% -o deploysolution -name BugDatabase.wsp -allowgacdeployment -immediate -force

Echo Adding Solution CallCenter.wsp

%STSADM% -o addsolution -filename %SLNDirectory%CallCenter.wsp

Echo Deploying Solution

%STSADM% -o deploysolution -name CallCenter.wsp -allowgacdeployment -immediate -force

Echo Adding Solution ChangeRequest.wsp

%STSADM% -o addsolution -filename %SLNDirectory%ChangeRequest.wsp

Echo Deploying Solution

%STSADM% -o deploysolution -name ChangeRequest.wsp -allowgacdeployment -immediate -force

Echo Adding Solution ComplianceProcessSupport.wsp

%STSADM% -o addsolution -filename %SLNDirectory%ComplianceProcessSupport.wsp

Echo Deploying Solution

%STSADM% -o deploysolution -name ComplianceProcessSupport.wsp -allowgacdeployment -immediate -force

Echo Adding Solution ContactsManagement.wsp

%STSADM% -o addsolution -filename %SLNDirectory%ContactsManagement.wsp

Echo Deploying Solution

%STSADM% -o deploysolution -name ContactsManagement.wsp -allowgacdeployment -immediate -force

Echo Adding Solution DocumentLibraryReview.wsp

%STSADM% -o addsolution -filename %SLNDirectory%DocumentLibraryReview.wsp

Echo Deploying Solution

%STSADM% -o deploysolution -name DocumentLibraryReview.wsp -allowgacdeployment -immediate -force

Echo Adding Solution EventPlanning.wsp

%STSADM% -o addsolution -filename %SLNDirectory%EventPlanning.wsp

Echo Deploying Solution

%STSADM% -o deploysolution -name EventPlanning.wsp -allowgacdeployment -immediate -force

Echo Adding Solution ExpenseReimbursementApproval.wsp

%STSADM% -o addsolution -filename %SLNDirectory%ExpenseReimbursementApproval.wsp

Echo Deploying Solution

%STSADM% -o deploysolution -name ExpenseReimbursementApproval.wsp -allowgacdeployment -immediate -force

Echo Adding Solution HelpDesk.wsp

%STSADM% -o addsolution -filename %SLNDirectory%HelpDesk.wsp

Echo Deploying Solution

%STSADM% -o deploysolution -name HelpDesk.wsp -allowgacdeployment -immediate -force

Echo Adding Solution InventoryTracking.wsp

%STSADM% -o addsolution -filename %SLNDirectory%InventoryTracking.wsp

Echo Deploying Solution

%STSADM% -o deploysolution -name InventoryTracking.wsp -allowgacdeployment -immediate -force

Echo Adding Solution ITTeamWorkspace.wsp

%STSADM% -o addsolution -filename %SLNDirectory%ITTeamWorkspace.wsp

Echo Deploying Solution

%STSADM% -o deploysolution -name ITTeamWorkspace.wsp -allowgacdeployment -immediate -force

Echo Adding Solution JobRequisition.wsp

%STSADM% -o addsolution -filename %SLNDirectory%obRequisition.wsp

Echo Deploying Solution

%STSADM% -o deploysolution -name JobRequisition.wsp -allowgacdeployment -immediate -force

Echo Adding Solution KnowledgeBase.wsp

%STSADM% -o addsolution -filename %SLNDirectory%KnowledgeBase.wsp

Echo Deploying Solution

%STSADM% -o deploysolution -name KnowledgeBase.wsp -allowgacdeployment -immediate -force

Echo Adding Solution LendingLibrary.wsp

%STSADM% -o addsolution -filename %SLNDirectory%LendingLibrary.wsp

Echo Deploying Solution

%STSADM% -o deploysolution -name LendingLibrary.wsp -allowgacdeployment -immediate -force

Echo Adding Solution PhysicalAssetTracking.wsp

%STSADM% -o addsolution -filename %SLNDirectory%PhysicalAssetTracking.wsp

Echo Deploying Solution

%STSADM% -o deploysolution -name PhysicalAssetTracking.wsp -allowgacdeployment -immediate -force

Echo Adding Solution ProjectTrackingWorkspace.wsp

%STSADM% -o addsolution -filename %SLNDirectory%ProjectTrackingWorkspace.wsp

Echo Deploying Solution

%STSADM% -o deploysolution -name ProjectTrackingWorkspace.wsp -allowgacdeployment -immediate -force

Echo Adding Solution RoomEquipmentReservations.wsp

%STSADM% -o addsolution -filename %SLNDirectory%RoomEquipmentReservations.wsp

Echo Deploying Solution

%STSADM% -o deploysolution -name RoomEquipmentReservations.wsp -allowgacdeployment -immediate -force

Echo Adding Solution SalesLeadPipeline.wsp

%STSADM% -o addsolution -filename %SLNDirectory%SalesLeadPipeline.wsp

Echo Deploying Solution

%STSADM% -o deploysolution -name SalesLeadPipeline.wsp -allowgacdeployment -immediate -force

Friday, April 11, 2008

Workflows do not start on a document library with Custom List Form SharePoint control on edtiform.aspx

Interesting discovery

If you are using Custom List Form SharePoint control to edit/enter metadata for your document library, documents will not get automatically checked in upon document upload thus preventing workflows to start.

Here is the situation I had to deal with:

A document library is set to "Require documents to be checked out before they can be edited?" to "Yes". under normal circumstances, when you upload a document on the EditForm.aspx you would have  two buttons "Check in"(it would save the metadata associated with the document and check the document in) and "cancel" (which would discard all metadata changes, keep in mind that it does not discard the doc it's self) on top of the form as well as on the bottom.

if the library is set "Require documents to be checked out before they can be edited?" to No when the document is uploaded on the editform.aspx you would have  instead of "Check in" button a standard OK button.

If you are using a Custom List Form SharePoint control  on the EditForm.aspx, and "Require documents to be checked out before they can be edited?" is set to yes,  on top of the edit form you will see "OK" button and on the bottom "check in" button alongside with the standard "cancel". One would presume that clicking the "Check in" button would check in the document.

Unfortunately it does not happen, neither clicking the "OK" button checks the doc in, which results to workflows not starting, because the document does not automatically gets checked in.

I'm not sure if it's a BUG, if it is then for some reason I could not find any information of this.

Only setting this doc library not to require document check out fixes the problem. but quite often it's not a desired functionality.

Tuesday, April 1, 2008

"New" company or "New" employer!!!

Very interesting day... Something that I thought would be a company-wide meeting turned into a BIG announcement.... I guess, I work for EMC now :-)

Don't get me wrong... I was not looking for a new job, I've been very happy at Conchango. WE are being acquired by EMC!

Exiting times and new opportunities!!!!!!!

Technorati Tags: ,,

Friday, March 28, 2008

Cannot open virtual machine in VMware Workstation

You will receive this error when your virtual machine was not properly shut down "Could not open virtual machine: C:\.......\machinename.vmx. This virtual machine appears to be in use." This can be due to the host computer system crush. The virtual machine becomes "virtually" :-) unusable, because you cannot start it.

Open up the folder with this VM image configuration file, you will see about four folders with .lck extension. These folders get created upon the start of the VM image, if the VM is properly shut down these folders will be automatically deleted, but if the VM was not shut down properly they will persist in the folder, thus preventing you from starting this image by sending the wrong message to the system about the status of your machine.

Here is how you can resolve this issue. Delete these folders and your VM image will start up.

It's that easy

Friday, March 21, 2008

Follow Up: Training Classes Scheduling Solution (Full Version)

Even though the goal for the Beagle Article was to introduce you to one of many ways you can unleash the power of SharePoint designer with DataView Web Parts, to show how you can create a business solution without custom coding and in a minimum time-frame. I originally picked this scenario just because most of you who are working in medium- to large-sized companies can relate to this topic.

As it turned out, most of you were actually looking for something to solve this particular business need.

So.... Due to the overwhelming demand for a "FULL" version of this solution.. without further interruptions.....(drums)... here it is...

The following solution  will help to facilitate class scheduling and management of attendees by providing employee self-signup functionality and attendance approval administrative interface.

Let’s review the functionality required. An employee of the company goes to the training site and sees all available classes that were scheduled by trainers ( Figure 1). With a click of a button they sign up for the class of their choice and are presented with a list “My Classes”, this list allows employees to keep track of classes they have signed up for. All classes scheduled will have a limited number of seats, and people that sign up for a class will have to be approved by a trainer or a manager. Once the person gets approved, the number of seats gets automatically updated to reflect the number of people attending the class.

image001

Figure 1

The site that this solution will be built in, is created using a team site template. Create a calendar list named “Classes”, this list will be used to schedule classes, track number of seats available, and assign trainers to a class (Figure 2).

image002

Figure 2

Only four fields in this list need an explanation:

1. Seats – this column will hold a number to represent a total number of seats available for this class.

2. Filled seats – this column is going to hold the number of attendees that signed up for the class a have been approved by a manager, the default value is “0”.

3. Seats Increment – this column will be used to increment “Filled Seats” column. This is created as calculated field. When an attendee gets approved by a trainer, Filled seats column will be updated with this column value which is [Filled seats] +1. (Figure 3)

4. ClassID – this field will hold the same value as the actual raw ID. It will be populated by a workflow on creation of an item in the list. This field will be used to identify the raw in Classes list to increment “Filled seats” column when attendee gets approved to attend the class.

image003

Figure 3

Open this site in SharePoint Designer and create a workflow based on Classes list, verify that the workflow starts on new item creation, set field “ClassID” to “Classes:ID”, or to Current Item ID.

Second, create a custom list called “Attendees”. This list will be used to keep track of people signed up for a particular class (Figure 4).

image004

Figure 4

1. Title – Title of the class employee signed up for.

2. Start Time – Start Time of the class employee signed up for.

3. End Time - End Time of the class employee signed up for.

4. ClassID – this column will hold a raw ID of an actual item from the Classes list and will be used as a link between two lists.

5. Approval – this column will be a choice column with following values: Pending, Approved, Rejected. The default value in the field will be “Pending”.

These columns will be populated with information by a workflow triggered by an employee clicking the “Sign Up” button.

Open dafault.aspx page in SharePoint Designer.

Insert DataView Web Part onto the default.aspx page. Choose “Classes” list as your Data Source. In “Common Data View Tasks”, click “Edit Columns” and select Title, Start Time, End Time, Location, Trainer and Seats as displayed columns (Figure 5).

image005

Figure 5

Once the Data View Web Part is rendered, add a filter to the view where “Start Time” is equal or greater than [Current Date], there is no, or little value in allowing users to sign up for a class that has already passed. In the DataView Web Part insert an extra column to the right of the “Seats” column. Open “Toolbox”, drag and drop “Form Action Button” control into this empty column. SharePoint Designer will then prompt you with a “Form Action” menu. Double click “Custom action” and click on “Settings”.

This action will bring you to the SharePoint Designer and create a new workflow that will be attached to the button. Create a workflow variable called ClassID as “List Item ID”. We will use it to pass the selected Item ID parameter from the DataView Web Part into this workflow.

Next, create an action that will trigger “Create New List Item” in the “Attendees” list. The title will be a value from the “ Title “ field in Classes list where Classes:ID equals workflow variable “ClassID” . Next, you will add a “Start time” field and set it to Classes list’s Start Time field (where Classes:ID equal workflow variable “ClassID”). Repeat this routine for population of the End Time field value. Add ClassID Field from the Attendee list and set it to workflow variable “ClassID” (Figure 6).

image006

Figure 6

Save the workflow. In Tag Properties of your Form Action Button, change the value property to “Sign Up”. Go to your “onClick” event. It should read something like this:

javascript: {ddwrt:GenFireServerEvent('__workflowStart={{7696F6EA-2079-4A53-A97B-CE61D99A02AB},New,{66402E3B-C94E-4E6F-9936-10E596CC5795},}')}

Modify it and add the following (see addition in red color):

javascript: {ddwrt:GenFireServerEvent(concat('__workflowStart={{7696F6EA-2079-4A53-A97B-CE61D99A02AB},New,{66402E3B-C94E-4E6F-9936-10E596CC5795},ClassID=’,@ID,’};__redirect={MyClasses.aspx}'))}

This change will allow you to pass an input parameter into a workflow and redirect your employee to MyClasses.aspx page that has attendees list view filtered by Created field equals [Me].

Create My Classes view in Attendees list and add this to MyClasses.aspx page, don’t forget to save your default.aspx as well.

The next part of this solution is the creation of the administrative interface that will be used to manage attendees and classes.

Create another page “ManageClasses.aspx”. Insert DataView Web Part with Classes list as the data source, then insert another Dataview with Attendees list the Data Source. Right-mouse click on Classes DataView and select Web Part Connections. Choose “Send Row of Data To”, then “Connect to a Web Part on this page”. Next, select Attendees Web Part and choose “Get Filter Values From”. From the Attendees side, select ClassID and from Classes select ID (Figure 7).

image007

Figure 7

Finish this wizard and save the page. Next go to Attendees’ Data View Properties, select “Editing Tab”, Check “Show edit item links”. Save the page.

Create a new workflow and attach it to the attendees list.

The workflow should start on an Item change event. As the next step, create a condition “Compare Attendees field”, choose “Approval” field equals to “Approved”. Under this condition create an action that will update list item in “Classes” list. Select “Filled seats” field and set it to “Classes” list “Seats increment” field value (If you remember, we set this field to a calculated value of “Filled seats” column plus one) where Classes:ClassID equals to Current Item’s ClassID (Figure 8).

image008

Figure 8

As the next step add another branch to your workflow, set the condition and check for “Approval” field to be equal to “Rejected” value. In actions menu use send an email notification to the user who created the current item, this email will notify the attendee that their attendance for the class has not been approved. Add another action to this branch to delete the current item.

Here is how your workflow will look at the end (Figure 9).

image009

Figure 9

Let’s review the solution and recap.

When a trainer goes to ManageClasses.aspx page and clicks on a particular Class, he/she will be presented with a list of people that signed up for this class with ability to approve/reject the attendance for chosen class(Figure 10). When attendee is rejected, attendee receives an email notification and the record gets deleted from Attendees list. If attendee gets approved the number of seats filled for this class gets incremented.

image010

Figure 10

Both groups benefit from this solution, SharePoint users are able to sign up for a class with a single click of a button, and training managers have simple to use interface to quickly and efficiently manage classes and attendance.

ENJOY!

Wednesday, March 19, 2008

Installing SQL 2008 (CTP6) on Windows Server 2008

To all of you who are used to building your own VM images for SharePoint and want to try “the latest and the greatest” such as building an image for SharePoint on Windows 2008 with SQL 2008.

Inspired by “Best of Windows Server 2008 and SQL Server 2008 for SharePoint Deployments “ session at SPC2008 presented by Joel Oleson  and Bob Fox (by the way, IT WAS GREAT!)       

Well, I’ve decided to built test image for SharePoint.

Installation of Windows Server 2008 went smoothly. As I always did before, I configured it as Domain Controller and finished the rest of the steps.

The SQL 2008 installation was aborted though with the following message “Database Engine failed to install”.

Very puzzling at first… It seems that if run DCPromo to make your image a Domain Controller (creating a new Domain) prior to the Installation of SQL, installation of SQL will fail.

What I have found is that if you install SQL 2008 without having DC role for the server, the installation went very well. Then I assigned the DC role to the server running dcpromo.

Installation of SharePoint ran normally and now I have a new image!

The moral is change your install sequence!

Wednesday, March 12, 2008

Assigning InfoPath Form template to forms library in a custom site Definition

I ran into a very interesting issue today.
It should be very straight forward to assign your custom xml form as a default template for forms library in your custom site definition.
And I’m not talking about globally overwriting the default template.xml, I just want form libraries within sites created from my custom site definition to use this template.
If you are interested in the steps, here they are:
You open your ONET.xml and locate the following lines (if you don’t have it, you can add it)

<DocumentTemplate XMLForm="TRUE" Path="STS" DisplayName="$Resources:core,doctemp_BlankForm;" Type="115" Default="TRUE" Description="$Resources:core,doctemp_BlankForm_Desc;">
<DocumentTemplateFiles>
<DocumentTemplateFile Name="doctemp\xmlforms\blank\template.xml" TargetName="Forms/template.xml" Default="TRUE" />
</DocumentTemplateFiles>
</DocumentTemplate>

NOTE: If you have custom list definition for your library, make sure TYPE property matches DocumentTemplate Type property.

So, I would expect that by simply adding my xml file to C:\Program Files\Common Files\Microsoft Shared\web server extensions\12\TEMPLATE\1033\STS\DOCTEMP\XMLFORMS\BLANK\ directory and modifying the Name property to point to my xml file instead of template.xml, I would get it working.
To my surprise, the template that was picked up by my library still was the original template.xml
Well, the solution turned out to be really simple, move your custom xml template file OUT OF “\BLANK\” directory, simply put it into C:\Program Files\Common Files\Microsoft Shared\web server extensions\12\TEMPLATE\1033\STS\DOCTEMP\XMLFORMS\ and modify DocumentTemplate’s Name property to point to it.
In my case it looked something like that “C:\Program Files\Common Files\Microsoft Shared\web server extensions\12\TEMPLATE\1033\STS\DOCTEMP\XMLFORMS\customForm.xml”
Save ONET.xml, reset your IIS.

Tuesday, March 11, 2008

Tips for custom EditForm and NewForm

First of all, if you create new custom page for editing or adding items, BASE IT OFF THE ORIGINAL EditForm.aspx or NewForm.aspx.
You do it by saving these files “AS”.

Second of all, DO NOT REMOVE THE ORIGINAL ListFormWebPart.
If you do it, you will not be able to set this page as the default edit or add page.
Even if you don’t create custom page, instead you modify the default once, when users are opening item for edit, they will be redirected to the home page of the portal.

The key is to hide the original ListFormWebPart and modify some properties in order for it not to be displayed and interfering with the submission of the custom List Form webPart that will be doing all the action.
Here are the properties that you will have to modify in the original ListFormWebPart:
1. <IsVisible>true</IsVisible> set it to <IsVisible>false</IsVisible>
2. <ControlMode xmlns="http://schemas.microsoft.com/WebPart/v2/ListForm">Edit</ControlMode>
Or
3. <ControlMode xmlns="http://schemas.microsoft.com/WebPart/v2/ListForm">New</ControlMode>

set it to

<ControlMode xmlns="http://schemas.microsoft.com/WebPart/v2/ListForm">Display</ControlMode>

Enjoy

Thursday, February 21, 2008

Saving site as a site template with DataView WebPart

As most of us know that if you create a site out of a custom site template with DataView Web Part on it, the DataView Web Part pages of this site are not going to display properly.

The Error presented in the browser will be like this:
“Unable to display this Web Part. To troubleshoot the problem, open this Web page in a Windows SharePoint Services-compatible HTML editor such as Microsoft Office SharePoint Designer. If the problem persists, contact your Web server administrator.”

When SP creates the site, it recreates lists, thus assigning a brand new GUID to it.

Sure enough if you open the page in SharePoint designer you will see that the DataVIew Web Part has lost it’s data source because it still refers to the original list’s GUID that it was bound to. But there is a way to avoid this.
And, no, I’m not going to take all the credits for this tip, as it was generously given to me by my colleague, Jonathan Bradshaw (Thank you J).

You can preserve the DataView Web Part data source by binding it not to the GUID of your list but to the List Name instead:

• Open the web part definition in your editor of choice
• Look for all occurrences of ListID in the web part definition and right next to that you should see a GUID.
• Replace ListID with ListName and the GUID with the list name you want to bind to.

It’s that easy.

Wednesday, February 13, 2008

Conditionally hide or show metadata fields in your document library EditForm.aspx

Working for years with web based applications taught me a valuable lesson, put as much as you can on the client side to minimize the number of calls to the server. Javascript comes to the rescue. Never underestimate the power of client side javascript.

Lots of developers and just “SharePoint people” :-) came up with this question: How do I hide or display document library metadata fields depending on metadata values chosen by an end user, such as radio button selection.

Yes, you can open Visual Studio and start developing, I’m all about taking an easy path, it’s not the only one, but in this case it turned out to be the best.

Here is a small requirement that one of our clients had. Depending on a radio button which an end user selects in the document properties, hide certain metadata fields.
First of all you open EditForm.aspx in the browser and view the source code. Locate the radio buttons or your other controls that are serving as the condition for the “Hide/Show” functionality, copy these control’s ID values. In my case it looks like this:

<span class="ms-RadioText" title="New Submission"><input id="ctl00_m_g_6d20c8e6_473d_47f4_bb05_462a9b383491_ctl00_ctl02_ctl00_ctl01_ctl00_ctl00_ctl00_ctl00_ctl00_ctl04_ctl00_ctl01" type="radio" name="ctl00$m$g_6d20c8e6_473d_47f4_bb05_462a9b383491$ctl00$ctl02$ctl00$ctl01$ctl00$ctl00$ctl00$ctl00$ctl00$ctl04$ctl00$RadioButtons" value="ctl01" checked="checked" /><label for="ctl00_m_g_6d20c8e6_473d_47f4_bb05_462a9b383491_ctl00_ctl02_ctl00_ctl01_ctl00_ctl00_ctl00_ctl00_ctl00_ctl04_ctl00_ctl00">New Document</label></span>


I have three radio buttons with the following IDs:


1. New Document=“ctl00_m_g_6d20c8e6_473d_47f4_bb05_462a9b383491_ctl00_ctl02_ctl00_ctl01_ctl00_ctl00_ctl00_ctl00_ctl00_ctl04_ctl00_ctl01”
2. Resubmission=“ctl00_m_g_6d20c8e6_473d_47f4_bb05_462a9b383491_ctl00_ctl02_ctl00_ctl01_ctl00_ctl00_ctl00_ctl00_ctl00_ctl04_ctl00_ctl02”
3. Expired Material=“ctl00_m_g_6d20c8e6_473d_47f4_bb05_462a9b383491_ctl00_ctl02_ctl00_ctl01_ctl00_ctl00_ctl00_ctl00_ctl00_ctl04_ctl00_ctl03”


The same way I’m locating the ID of the field I have to hide. If “New Document” radio button is selected, hide “Related Document” document library field so the user cannot add a value to it.

For the next step, open your EditForm.aspx in SharePoint Designer. Within one of your <asp:Content> add the following :


<script type="text/javascript" language="javascript">
// Initiate InitLoad () function on the load event of your editForm.aspx
window.attachEvent("onload",InitLoad);
//in this function, assign event handlers to your controls
function InitLoad() {
//declaring the first radio button and attaching “onclick” event handler to it
var NewDoc = document.getElementById("ctl00_m_g_6d20c8e6_473d_47f4_bb05_462a9b383491_ctl00_ctl02_ctl00_ctl01_ctl00_ctl00_ctl00_ctl00_ctl00_ctl04_ctl00_ctl01");
NewDoc.attachEvent("onclick",HideFields);
//declaring the second radio button and attaching “onclick” event handler to it
var ReSub = document.getElementById("ctl00_m_g_6d20c8e6_473d_47f4_bb05_462a9b383491_ctl00_ctl02_ctl00_ctl01_ctl00_ctl00_ctl00_ctl00_ctl00_ctl04_ctl00_ctl02");
ReSub.attachEvent("onclick",HideFields);
//declaring the third radio button and attaching “onclick” event handler to it
var Expire = document.getElementById("ctl00_m_g_6d20c8e6_473d_47f4_bb05_462a9b383491_ctl00_ctl02_ctl00_ctl01_ctl00_ctl00_ctl00_ctl00_ctl00_ctl04_ctl00_ctl03");
Expire.attachEvent("onclick",HideFields);
}
function HideFields(){
var DocType = document.getElementById("ctl00_m_g_6d20c8e6_473d_47f4_bb05_462a9b383491_ctl00_ctl02_ctl00_ctl01_ctl00_ctl00_ctl00_ctl00_ctl00_ctl04_ctl00_ctl00");
if (DocType.checked==true){
// declare my metadata field “Related Documents” to be hidden using the ID from “View Source”
var RelatedDocs = document.getElementById("ctl00$m$g_6d20c8e6_473d_47f4_bb05_462a9b383491$ctl00$ctl02$ctl00$ctl01$ctl00$ctl00$ctl18$ctl00$ctl00$ctl04$ctl00$ctl00$TextField");
RelatedDocs.style.display = "none";
}
}
</javascript>


I’ll continue posting on the use of javascript within Sharepoint, stay tuned :-).